While thrifting last week, I found a pair of bold print pants for $1.
I knew the minute I saw the pants that they would become my 2nd flower fairy.
I gathered my basic supplies.
Plastic egg, air dry clay, wire, glue, paint, glitter glue, pedal fabric (the pretty blue pants!), other potential fabric for her dress, potential trim lace/other, thread and clear coat.
I covered the egg with a thin layer of air dry clay. The clay takes forever to dry over the plastic egg.
If you're impatient, you might prefer using a foam ball or a ball of newspaper or foil - they dry faster!
While the body is drying (a couple days or so), cut out the flowers from the pants/skirt/shirt you picked for your pedals and/or leaves. If you want leaves on your piece, like I did with this yellow and orange fairy, you need to place the pedals against her face first. Then attach the leaves.
Add wire for arms and legs. I found it useful to duct tape them in place.
Also add the face, head and neck, bulking/sculpting it out with clay as needed.
I used a mold to create the face and then I 'tweaked' it slightly.
Be sure to put clay over the wires and duct tape.
You'll probably need to let it dry for another couple of days before trying to sculpt the arms, legs, feet and hands (the head, arms and legs tend to move out of position when one tries to do it all in one step).
Paint your dried body with flesh tone paint. Paint her eyes, lips and other facial details. Let dry.
Use pvc glue and place pedals/leaves around the fairy's face.
Use glue, or Stiffy, to shape the pedals into position.
I went about layering the pedals around her face, and shoulders.
Mini scissors, tweezers and tooth picks work well for pushing the pedals into place.
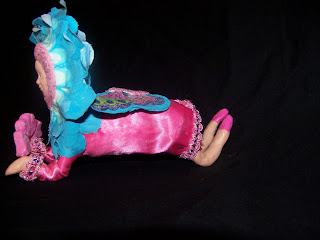
If your fairy comes to life, as mine did, she'll begin to speak to you. Her voice will be strong and her words clear. My fairy wanted to be a blue flower fairy with accents of pink and insisted I dress her the way I imagined her in the beginning (there are times when one speaks to me and say 'no way I'm wearing that!' which means I have to alter my plan and see what happens.
Her wings were created from a butterfly print nurses scrub. I cut the butterflies out the same way I cut out the pedals. I used glitter paint to cover each color of the wings, front and back, to give them sparkle. I wrapped a piece of wire around them so I could insert them into later.
The vivid pink satin became her dress and mini shorts. I simply tucked the fabric around her to form her shorts and tacked it in place on the sides, as if I diaper. Her dress was estimated by putting a piece of fabric around her with the opening at the back. I drilled a hole for the of wings, and mounted them with glue. Then I stitched her dress on above and below the wings and around her neck and shoulders.
A week before making her, I had found a great trim piece with lots of metallic colors - blue, yellow, pink and green - mixed in. The trim was too wide for the scale of my fairy so I cut it in half - perfect!
Hope was created with a mini heart cutter. I stuck a piece of wire through each heart, wiggled it a bit to make it slightly loose and let them dry. Once dry, I slid them off the wire, sanded them lightly, painted, sealed and restrung them. I wrapped the ends of the wire around her wrists and covered it with trim. Hope just seems to fit, given her optimism and joy as spring approaches.
Tada! At last she came to life!
Now, she's ready to lounge about in the sunshine and play with others.
I wish the photos would show all the shimmer and shine she has in person!
Thanks for visiting my blog. I hope you enjoyed the process of "When flowers come to life" and my little flower fairies.
I'm off to create... something!


No comments:
Post a Comment